English |
Português |
English |
Português |
|
|||||||||||||||||||||||||||||||||||||||||||
|
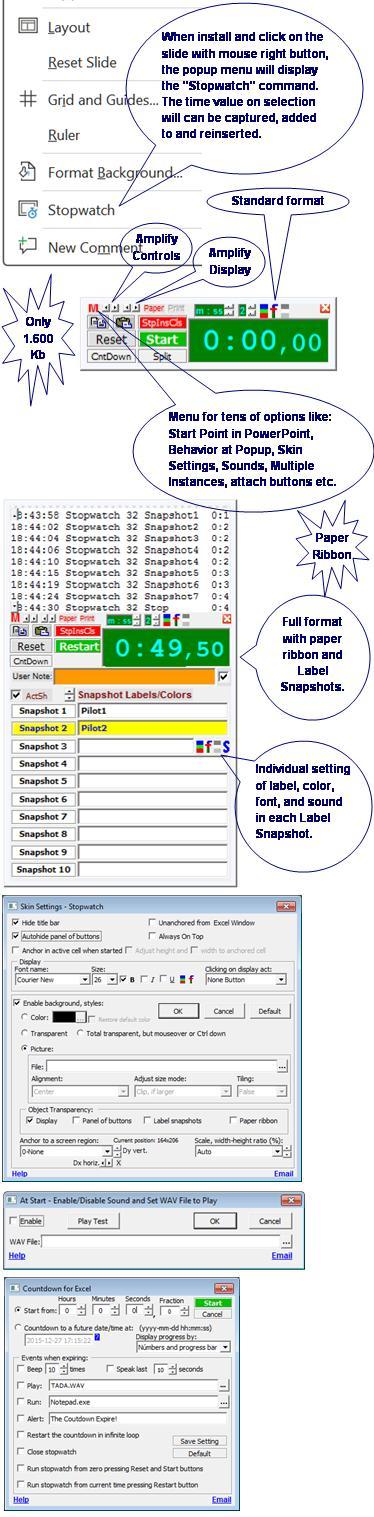
This utility generates a special popup Stopwatch in Microsoft® PowerPoint® with Countdown (Timer). It is programmed in Microsoft Visual Basic® for Application (VBA) and optionally available as COM Add-in (dll), EXE Add-in (ppa/exe), or PowerPoint Add-in (ppa), may be useful for PowerPoint interface user and VBA programmers. See the pictures below. It consists basically of only one file (PowerPointStopwatch.dll, PowerPointStopwatch.exe, or PowerPointStopwatch.ppa) that can be installed automatically using one of the installer package files available below to download. Except for the DLL, if you choose COM Add-in, no other setting is saved in the Microsoft Windows® Register. Its setting is saved in PowerPointStopwatch.ini, PowerPointStopwatchLoadExe.ppa, PowerPointStopwatch1.ppa, and PowerPointStopwatch1.ppam files that are created and maintained by the proper utility. You also can uninstall it automatically, leaving no mess on your Windows Register or disc. Following items in this page: Examples of Using the Stopwatch Features:- Stopwatch - Countdown (Timer) with progress bar that can be hidden or exclusive - When the countdown expires, it can beep, play a WAV file, run a Windows program, run a macro via OLE Automation in an open or closed Microsoft Office file, send keystrokes to the window of an application running in Windows, and/or alert expiration - Can speak (pronounce) in robot voice, announcing second by second the last n seconds of a countdown - When the countdown expires, it can yet: (1) immediately restarts the same countdown in infinite loop, or (2) simultaneously presses Reset and Start button of the stopwatch to start counting from zero, or (3) simultaneously presses the Start or Restart button to start or restart counting from the current time on the display. These last two options make possible that, when a countdown expires, one or several instances with attached buttons simultaneously start or restart their counts. For example, in a contest with starting shot, you open an instance for each competitor with Start buttons attached, and, in the one of the instances, you set a countdown to generate the starting shot and automatically starts its stopwatch and the stopwatches of all others competitors at the same instant - Allows multiple instances within a single instance of PowerPoint with independent buttons, settings, counting, and results. In practice quantities, there is no limit to the number of simultaneous instances, and there is no degradation in the count accuracy or display update - Start, Stop, Restart, StopIns, and Reset buttons of same category in all instances or in only some of them running independently can be attached to be triggered simultaneously with a single click - Buttons of same category attached according to the previous item are distinguished by * in their captions - Start or Restart buttons in all instances or in only some of them running independently can be attached to Stop buttons of different categories to be triggered simultaneously with a single click. Makes it possible that, when starting or restarting an instance, stop all other ones with buttons thus attached - Buttons of different categories attached according to the previous item are distinguished by º in their captions - Start or Restart buttons in all instances or in only some of them running independently can be attached to StopIns buttons of different categories to be triggered simultaneously with a single click. Makes it possible that, when starting or restarting an instance, stop and insert in the sheet the time in the display in all other ones with buttons thus attached - Buttons of different categories attached according to the previous item are distinguished by ª in their captions - No matter how many instances are opened, the events on all attached buttons happen at the same instant of the click, without more or less milliseconds between instances. You can verify this by turning on the print on the paper ribbon or on a split in sheet - The feature of multiple instances can be disabled - Split time reports (Snapshots) directly in Excel sheets, one new sheet for each popup in the same workbook created during each execution or when saved and closed one - If, when pressing Split button and Excel cell cursor is over an old split report, you will be prompted to resume it. Or, if the active cell is blank and there is a sufficient blank cell range in front (> 25x8) for a report, you will also be prompted to start a new report right there, from the active cell. If there are no reasons for prompts or if you deny them, follows that described in the previous item, immediately creating a new default sheet for the split time report - Reports of split time with labels (Label Snapshots), allowing set up of as many as 10 snapshot buttons in the interface with different labels, background and front colors, and sounds. Labels and colors set up in an interface button are also duly registered in the split sheet cells - Five display modes - Display background and front colors can be changed by the user - The display size can be adjusted via a button on the interface or along the borders with the mouse, and the font size adjusts automatically, or vice versa, where the font size can be specified and the display then adjusts automatically. The font can also be formatted in color, name, bold, italic and underline - The panel of buttons can be adjusted to any size through an interface button - The width and height of the interface automatically adjust to the minimum to accommodate the display and all visible controls, but you can define a scale between width and height such as that of the screen in use, of the inserted background picture, of a common standard in monitors and televisions (4:3, 14:9 and 16:9) or any percentage greater than zero where the minimum or maximum scales supported will be automatically limited according to the automatic minimum width of the stopwatch or the height of the screen in use - All settings of an instance can be saved in a file on the disc and named by the user to be opened in another parallel or future instance - The last opened setting or the last closed instance setting will be used as default in the next new instance - Decimals used for the precision of a millionth of a second - Can capture and insert in the selection - Can capture either positive or negative time in selection. The positives are prepared to be increased by the stopwatch enabling the Restart button and the negatives are prepared for the countdown - Positive time in cells can be numeric or formatted text, numeric according to Excel definitions to represent dates and times by decimal numbers, or formatted text inserted normally into cells with text format or preceded by a quotation mark in cells without text format. Examples: 5:10.25 or '5:10.25 (Five minutes, ten seconds and twenty-five hundredths of a second), 10 or '10 (Ten seconds) - Negative time in cells can only be in the formatted text, because Excel does not represent a negative time through a negative decimal number. Therefore, negative time should always be inserted as formatted text between brackets or preceded by a quotation mark and a negative sign. Examples: (5:10.25) or '-5:10.25 (Five minutes, ten seconds and twenty-five hundredths of a second) , (10) or '-10 (Ten seconds). See also the examples in 1 - Time Roast Chicken Recipe and 4 - Time Countdown to Auction Ending at the end of this homepage - The behavior of popup can be set via menu to: Reset the display (Not capture the selection), Start the stopwatch, and Popup in the last saved position The behavior of the StopIns button can be set via menu to: (1) Stop, Insert and Close (Red), (2) Stop, Insert, and Reset (Brown), (3) Stop, Insert, Reset, and Start (Olive), (4) Stop and Inset (Orange), (5) Insert only (Blank), or (6) Disable. Options from 1 to 4 makes it possible that a single click generates more than one action at the same instant, without more or less milliseconds - The StopIns button can also be set to insert the result into the current active cell or into the active cell when started. In this last case, the stopwatch instance is attached to the cell where it originated and the cell address appears in the stopwatch title - The behavior of the Reset button can be set via menu to: (1) Reset only or resume if in countdown triggering the configured events, (2) Reset and Start, (3) Insert, Reset, and Start, or (4) Disable. Options 2 and 3 makes it possible that a single click generates more than one event at the same instant, without more or less milliseconds - Pops up in small size, but you can configure it from icon size to a size that occupies or exceeds the entire screen - Pops up close to the mouse cursor or, optionally, at the last saved position, but you can configure it to anchor in up to nine regions of the screen, such as Top Left, Center, Bottom Right, etc., and also Random region and Mouse Position. You can also configure horizontal and vertical offset in relation to the anchored region. The Random option acts as a screen saver and the Mouse Position option allows you to anchor (Fix) the mouse over any button or display of the stopwatch (Ctrl releases) - Can auto-popup when selecting cells with time formats or cells specifically defined to auto-popup - Auto-popups can happen simultaneously in different cells, although no more than one in each cell - An instance created in a cell auto-popup is tied to the same cell as the standard - Can be set up with independent sound from WAV files for each of the following buttons: Start, Stop, Restart, StopIns, Snapshot, and Reset, including yet one for each of the 10 Label Snapshots - All sounds, including the digital paper ribbon one, may be temporarily disabled - Can print time and setting on a digital paper ribbon in each event - Can capture back to the display times and settings registered on digital paper ribbon - Can send some or all lines on the digital paper ribbon to the printer - Can copy the time on display to Windows Clipboard - Can paste on display existent the time on Windows Clipboard - Can be called by the mouse right button (Context menu), or by a button in the PowerPoint Standard toolbar (2007, 2010, or 2013 Ribbon Add-ins tab) - Accepts the following hotkeys that make it possible to count time only using the keyboard:
- Start/Stop/Restart button: Enter or Space - In the foreground, the skin can be configured as follows: transparency of the display and buttons, hiding of the title bar and activation of a button when clicking on the display. In the background, it can be configured as: opaque by color or picture and transparent or totally transparent. In the Transparent option, if the display is also configured as transparent, only the count numbers are visible. In the Totally transparent option, everything is hidden, including the count numbers, but they are visible along with the controls for closing and showing the button panel when you hover the mouse over the region of the screen where the timer is or when you press the Ctrl key on the keyboard - Can unanchored its window from PowerPoint window, making it possible that it is visible even if PowerPoint window is minimized - Can make its window is always on top in Windows - Can autohide the panel of buttons leaving visible only the count display. When approaching the mouse pointer, a tiny button appears to, if you click, unhide the panel that will be autohidden again when mouse go away - Can anchor in the cell that was active in Excel when it started and so always follows the cell displacement on the screen, upper-left corner with upper-left corner, inclusive disappearing and reappearing if the cell disappear and reappear on screen - Can position itself in-cell where it is anchored adjusting its width and/or its height to cell when the title and panel of buttons are hidden - The Default button in skin settings form allows you to view or restore all skin default settings - All instances running can be closed with a single click by selecting the Close All command in the menu - Each of the buttons Stop, Restart, Countdown (CntDown), Split/Snapshot, Copy, Paste and Display Panel (dp) in the interface can be disabled when not useful, preventing them from being unduly pressed - Excel cell can functions as another stopwatch button, similar to the StopIns button, where the act of selecting the cell functions as to trigger, but conditions can be set so that the triggering happens. So, only trigger when selecting cells: (1) With Time Format, (2) With Empty Content, (3) In Active Sheet when Started, (4) In Active Row when Started, or (5) In Active Column when Started. The trigger behavior can also be set to: (1) Stop, Insert, and Close the stopwatch, (2) Stop, Insert, and Reset, (3) Stop, Insert, Reset, and Start, (4) Stop and Inset, or (5) Insert only. And it can also be set to insert the result: (6) In Current Active Cell or (7) In Active Cell When Started. All these options are in the main menu, in "Excel Cell as Button" new sub menu - Excel cell can functions as stopwatch display where the contents or count on the display echoes in the contents or value of the active cell when started with the following setting options: (1) Echo Only on Time Format Cells and/or (2 ) Autohide Stopwatch When Mouse Move Away. These options are in the main menu, in "Excel Cell as Display" new sub menu - If set for multiple instances and to anchor in the active cell when started, when selecting multiple cells and acting Stopwatch command, you can create an instance in each one of all selected cells at once - Occupies less than 1600 Kb when installed - Can be called also directly from any VBA code thru the fStopwatch() and fGetVersion() functions. See, soon below the pictures for detailed descriptions of these functions and examples of VBA applications that use them. Configure Countdown:To configure a countdown in the stopwatch user interface, click the 'CntDown' button to display the Countdown form which has two groups of options: Types of countdown and Events to run when expiring. 1. Types of countdown with two options: 1.1. Option to countdown to zero. If you select this option, enter the time to be zeroed in hours, minutes, seconds and fractions of seconds, typing on the keyboard or clicking the mouse on the arrows in each text box. 1.2. Option to countdown to a future date. If you select this option, enter the exact future date and time to be reached or expired by typing on the keyboard or just using the mouse as the date/time text box has a built-in date/time picker where you can change a number directly in the format keeping the date and time valid, like this. - Position the text box cursor in front of the number to be adjusted, using the mouse or the right and left arrows on the keyboard. - To increment or decrement the number, use the up or down arrow keys on the keyboard or click with the mouse on the top or bottom of the text box cursor. - To enter today's date or current time and make it easier to adjust to a near future date, use the shortcut keys Ctrl + T (Insert Today, date only) or Ctrl + N (Insert Now, time only) or click the mouse on the T or N icons to the right of the text box. 2. Events to execute when the countdown expires with nine options where you can select none, one or more than one: 2.1. Beep. If you select this option, enter in the text box on the side the number of beeps to be emitted when the countdown expires. 2.2. Speak last seconds. If you select this option, enter in the box on the side the number of seconds to be spoken in countdown. 2.3. Play. If you select this option, enter in the box on the side the path and name of the WAV file to be played when the countdown expires. 2.4. Run. If you select this option, enter in the box on the side data for one of the three supported run types: - Run file. Enter the path and name of the file to run on Windows. If you only enter the name of the executable file, it will be searched for in the Windows default path. - Run macro. Enter the path, name of the Microsoft Office file and the name of the macro to run following this format: Path\FileName!MacroName. The file name and macro name separated by an exclamation mark are mandatory, the path is important and even recommended, but, if not provided, the file will be searched for in its respective Office application that is eventually running. It is also mandatory that the file name has an extension recognized by one of these Office applications: Excel, Word, PowerPoint or Access. It also supports the passing of up to five arguments to the macro in this format: Path\FileName!MacroName,Arg1,Arg2... Where comma separation is mandatory, and an argument cannot have commas in itself, but they can be passed encoded, replacing them by {%2C} - Send keys. Enter the command line for the independent SendKeys.exe utility (No path) integrated into the installation following this format: SendKeys.exe Arg1 Arg2 “Arg3” “Arg4” Arg5. The arguments are separated by space and as Arg3 and Arg4 can be text, they must be enclosed in quotation marks to support spaces in them. Arg5 is optional. See the full syntax details on the SendKeys.exe homepage here. 2.5. Alert. If you select this option, enter in the box on the side the desired message for the alert when the countdown expires. 2.6. Restart the countdown in infinite loop. If you select this option, when the countdown expires, it will immediately restart in an infinite loop. 2.7. Close Stopwatch. If you select this option, when the countdown expires, the Stopwatch will be closed immediately. 2.8. Run the stopwatch from zero pressing the Reset and Start buttons. If you select this option, when the countdown expires, the Stopwatch will be immediately zeroed and started. Tip! In multiple instances, attach Reset and Start buttons to reset and start multiple stopwatches simultaneously. 2.9. Run Stopwatch from current time pressing Restart button. If you select this option, when the countdown expires, the stopwatch will immediately restart from the time currently on the display. Tip! In multiple instances, attach Start and Restart buttons to start or restart multiple stopwatches simultaneously. The ‘Save Config.’ button saves the current setting as the default for future runs. The 'Default' button restores the factory default setting. Download:Tested in PowerPoint for Windows 2000, 2002(XP), 2003, 2007, 2010 (32 and 64-bit), 2013 (32 and 64-bit), and 2016-24 (32 and 64-bit) in MSI-based and Click-To-Run installations of Office 365™ cloud-based services.
See also for Microsoft Access®, for Microsoft Excel®, and for Microsoft Word. Add-in Options to Install:This utility can be available to be installed in three options of add-ins: EXE Add-in, COM Add-in, or PowerPoint Add-in. COM Add-in and PowerPoint Add-in run on Windows in the same process or memory space of PowerPoint and are well detailed technologies in PowerPoint documentation and good books about VBA, while EXE Add-in is a special name here for a mix of those two technologies where the same VBA code is run in separate EXE process and a small PowerPoint Add-in makes the connection between the two processes. Despite the differences in the technologies, this utility is fully functional in any of them. So, what can decide on your choice to install are the features below compared:
¹Temporarily unavailable. Pictures:
VBA fStopwatch() Function:The stopwatch can also be called directly from any VBA code using the fStopwatch() function, which has the same syntax as fStopwatch() of the Stopwatch for Excel, so code that calls one function can also call the other. However, since Excel and PowerPoint have different features, some arguments retain their names and positions but may only be useful in one of them. The fStopwatch() function here, as there, has the following 27 optional arguments and seven return values: 1 - InitialElapsed (Date/Time, Default=0)
2 - ResetAtPupUp (Boolean, Default=False) 3 - StartAtPupUp (String, Default=””) If at any position in the string there is:
"1" -
Start the stopwatch or countdown at the popup 4 - DisplaySetting (String, Default=””, aka DisplaySize). Define the setting for the stopwatch display with all options present in the "Display:" frame of the form shown by the “Face Settings...” command present in the stopwatch menu. It is a string composed of 9 substrings separated by ; in the format “n1;n2;s1;n3;n4;n5;n6;n7;s2” where: - n1 is an integer that defines the display font size.Long 2 to 500, Default="" to use the default setting or one saved in the file specified by the argument 21, SavedSettingFile). - n2 is one of the following options to Clicking on display act:
Empty - Use the default setting or one saved in the file
specified by the argument 21, SavedSettingFile - s1 is the display font name. Empty - Use the default setting or one saved in the file specified by the argument 21, SavedSettingFile - n3 is one of the following options for bold display font formatting:
Empty - Use the default setting or one saved in the file
specified by the argument 21, SavedSettingFile - n4 is one of the following options for italic display font formatting:
Empty - Use the default setting or one saved in the file
specified by the argument 21, SavedSettingFile - n5 is one of the following options for underline display font formatting:
Empty - Use the default setting or one saved in the file
specified by the argument 21, SavedSettingFile - n6 is an integer number (RGB) indicating a background color for the display Empty - Use the default setting or one saved in the file specified by the argument 21, SavedSettingFile - n7 is an integer number (RGB) indicating a color for the display font Empty - Use the default setting or one saved in the file specified by the argument 21, SavedSettingFile - s2 is a text to be concatenated to the default text of the stopwatch window title: Empty - The default title text will not be changed, there is no saved setting for s2 Any text, as long as it does not have commas or semicolons.
5 - DisplayMode (Long 0 to 10, Default=0 to use the default setting or one saved in the file specified by the argument 21, SavedSettingFile.) 6 - DecimalPlaces (Long 0 to 3, Default=-1 to use the default setting or one saved in the file specified by the argument 21, SavedSettingFile.) 7 - CountDown (Boolean, Default=False) 8 - PaperRibbon (Boolean, Default=False) 9 - Split (Boolean, Default=False. If True, start splitting time in a sheet) 10 - SplitSheet (String, Default="" to create a new time split sheet). (Only useful in ExcelStopwatch) 11 - SplitWorkbook (String, Default="" to use the active or to create a new, if SplitSheet=""). Here at PowerPointStopwatch it requires the full file name, name and path 12 - SplitStartCellRef (String, Default="A1"). (Only useful in ExcelStopwatch) 13 - ActivateSplitSheet (Boolean, Default=True) 14 - LeftPos (String, Default="0") 15 - TopPos (String, Default="0"). Where LeftPos and TopPos are the distances in points (1/72 inches) from the center of the Start button to the current mouse position. If the values are preceded by $ (dollar sign), LeftPos and TopPos turn to be the distances from left top corner of the stopwatch to the left top fix corner of the screen. And yet, if there is only the $ without number, will be used the current default position or one saved in the file specified by the argument 21, SavedSettingFile. Tip! The s2 option of argument 26 - SkinSetting is more flexible, precise and resilient, especially for positions that vary according to the screen size such as those in the bottom right region 16 - ShareSplitSheet (Boolean, Default=False to not allow that the split sheet is used simultaneously by other instance) 17 - WaitAndRetValue (Long 0 to 2, Default=0). Where:
0 -
Not return value, not asynchronous, and modeless 18 - CtrlPanelSize (Long 3 to 50, Default=0 to use the default setting or one saved in the file specified by the argument 21, SavedSettingFile) 19 - StopInsMode (String, Default=””). Define the setting to StopIns button behavior with all the options present in the stopwatch menu, StopIns Button Behavior submenu. It is a string composed of five substrings separated by ; in the format “n1;n2;n3;n4;n5” where: - n1 is one of the following options to the action or actions when acting StopIns button:
0 or
Empty - Use the default setting or one saved in the file
specified by the argument 21, SavedSettingFile - n2 is one of the following options to the cell to insert: (Only useful in ExcelStopwatch)
0 or
Empty - Use the default setting or one saved in the file
specified by the argument 21, SavedSettingFile - n3 is one of the following options to in Having Contents in the Cell to insert: (Only useful in ExcelStopwatch)
0 or
Empty - Use the default setting or one saved in the file
specified by the argument 21, SavedSettingFile - n4 is one of the following options to Insert Also Date and Time: (Only useful in ExcelStopwatch)
0 or
Empty - Use the default setting or one saved in the file
specified by the argument 21, SavedSettingFile - n5 is the title text of a window of another application running on Windows to insert. Instead of the title text, you can also use the number returned by the VBA Shell function (Task ID, the same as listed in the Windows Task Manager) and you can even use the Windows window handle number obtained via the API in call by VBA code. 20 - SnapshotSetting (String, Default=””). Define the setting to the ‘Label Snapshot’ buttons with all the options present in the stopwatch interface when dividing time in an Excel sheet. It is a string composed of 11 substrings separated by ; in the format "S0,S1,S2,S3,S4,S5,S6,S7,S8,S9,S10" where: - S0 is a string also composed of four substrings, but now separated by | in the format "n1|s1|n2" where:
- n1
is a number indicating the number of ‘Label Snapshot’ buttons to
show in the interface - S1 is a string also composed of four substrings, but now separated by | in the format "s1|n1|n2|s2" where:
- s1
is the label for the Snapshot 1 button to be inserted in the
split sheet - S2 up to S10 are similar to S1 string above for Snapshot 2 up to 10 buttons. Note: If a string or substring is set empty, it will be used the default setting or one saved in the file specified by the argument 21, SavedSettingFile. 21 - SavedSettingFile (String, Default= "" to use the default setting. Due to the quantity and difficult to set some features like colors, fonts, sounds, skin options etc., via arguments, although possible, perhaps the most practical thing to do is to open the stopwatch, set any all desired option via interface, and use the 'Save Setting As ...’ command on the menu to save the setting to a file. After inform the file name and its full path thru this argument) 22 - ResetMode (Long 0 to 4, Default=0). Define the setting to Reset button, as:
0 - Use the default setting or one saved in the file specified
by the argument 21, SavedSettingFile; 23 - OtherButtsMode (Long 0 to 127, Default=0). Define the setting to other buttons, as:
0 - Use the default setting or one saved in the file specified
by the argument 21, SavedSettingFile 24 - CellAsButTriggSlc (Long 0 to 2047, Default=0). Define the setting to Excel cell functions as a stopwatch button when selecting it, as: (Only useful in ExcelStopwatch)
0 - Use the default setting or one saved in the file specified
by the argument 21, SavedSettingFile 25 - EchoDisplayInCell (Long 0 to 7, Default=0). Define the setting to Excel cell functions as display of the stopwatch, as: (Only useful in ExcelStopwatch)
0 - Use the default setting or one saved in the file specified
by the argument 21, SavedSettingFile 26 - SkinSetting (String, Default=””). Define the setting to the stopwatch face with all the options present in the form showed by ‘Skin Settings…” command present in the stopwatch menu. It is a string composed of 9 substrings separated by ; in the format “n1;n2;n3;s1;n4;n5;n6;n7;s2;s3” where: - n1 is an integer number result of the sum of the following options:
Empty - Use the default setting or one saved in the file
specified by the argument 21, SavedSettingFile - n2 is one of the following options for the stopwatch background style:
Empty - Use the default setting or one saved in the file
specified by the argument 21, SavedSettingFile - n3 is an integer number (RGB) indicating a color to background Empty - Use the default setting or one saved in the file specified by the argument 21, SavedSettingFile - s1 is the path and name of a file on the disk with a picture to background Empty - Use the default setting or one saved in the file specified by the argument 21, SavedSettingFile - n4 is one of the following options to Alignment of the picture background:
Empty - Use the default setting or one saved in the file
specified by the argument 21, SavedSettingFile - n5 is one of the following options to Adjust size mode of the picture background:
Empty - Use the default setting or one saved in the file
specified by the argument 21, SavedSettingFile - n6 is one of the following options to Tiling small picture background:
Empty - Use the default setting or one saved in the file
specified by the argument 21, SavedSettingFile - n7 is an integer number result of the sum of the following options for the transparency of objects in the interface:
Empty - Use the default setting or one saved in the file
specified by the argument 21, SavedSettingFile - s2 is a string also composed of three substrings, but now separated by | in the format “r|dxH|dyV” where:
Empty
- Use the default setting or one saved in the file specified by
the argument 21, SavedSettingFile; - s3 is one of the following options for the scale, width-height ratio (%), of the stopwatch size:
Empty - Use the default setting or one saved in the file
specified by the argument 21, SavedSettingFile 27 - CountdownSetting (String, Default=””). Define the setting for an event or events at countdown expiration with all the options present in the form showed by 'CntDown' button present in the stopwatch interface. It is a string composed of 6 substrings separated by ; in the format “n1;n2;s1;s2;s3;n3;n4;n5” where: - n1 is an integer number result of the sum of the following options:
Empty - Use the default setting or one saved in the file
specified by the argument 21, SavedSettingFile - n2 is an integer number indicating the number of beeps that should be emitted Empty - Use the default setting or one saved in the file specified by the argument 21, SavedSettingFile - s1 is the path and name of the WAV file on the disk that should be played Empty - Use the default setting or one saved in the file specified by the argument 21, SavedSettingFile - s2 is the path and name of the executable file in the Windows on the disk which must be run properly formatted according to one of the three supported execution types: run file, run macro, and send keys (See section 2.4 of the ‘Configure Countdown’ item above) Empty - Use the default setting or one saved in the file specified by the argument 21, SavedSettingFile - s3 is the text of the alert that should be emitted Empty - Use the default setting or one saved in the file specified by the argument 21, SavedSettingFile - n3 is an integer number indicating the last seconds of the countdown that should be spoke Empty - Use the default setting or one saved in the file specified by the argument 21, SavedSettingFile - n4 is one of the following options to show the countdown progress on the display with:
Empty - Use the default setting or one saved in the file
specified by the argument 21, SavedSettingFile - n5 is the default time for future countdowns. Its format is a Double of a date/time. This time is ignored when starting in countdown mode due to the InitialElapsed and CountDown arguments Empty - Use the default setting or one saved in the file specified by the argument 21, SavedSettingFile Examples of VBA code: 1 - The code below calls the fStopwatch() with all default arguments, if its current version is duly installed. 2 - The code below calls the fStopwatch() with all default arguments, except the 3 (To start at popup and attach Start buttons) and the 9 (To start splitting in a new Excel sheet).
Notes about Early and Late Binding methods: The fStopwatch() function can give the following returns:
fRet = False (Cancelled by the user) VBA fGetVersion() Function:This function allows you to get information about the installed stopwatch from any VBA code. It has only one argument, which is optional and accepts these three values: 1 - Return installed stopwatch version number on 0.0.0 format (Default) 2 - Return the number of stopwatch instances currently running and 3 - Close all stopwatch instances currently running. Example of VBA code: See notes about Early and Late Binding methods. Examples of Using the Stopwatch:Let's look at nine examples of using the stopwatch in PowerPoint presentations. Each example has been developed in a presentation saved as a unique ppt file ready to be tested in its own presentation and with all the instructions for you to implement in your presentations and, if you don't want to edit your presentations, it is ready for you to save as a ppa add-in and then use in your presentations without editing them. Each ppt is a source code in which you can change the settings of the stopwatch or stopwatches, improve them and then save as the desired ppa add-in. Before that, see a comparative summary of the examples showing differences in the main objectives and the developments between them: - The example 1 deals with creating command in the PowerPoint menu and short menus to call the stopwatch in a popup at project time, at slide edition time. - The examples 2 and 3 deal with countdown of interval for pause in a presentation, such as coffee break. While the Example 2 uses external files for the background picture and the expiration sound, the Example 3 does not, and can use picture in one slide in the active presentation and transition sound on another slide.
- The
examples 4, 5, 6, and 7 deal with countdown of transition
time to advance slides in a presentation. While In examples
4 and 5, the times for all slides are taken at the beginning so
that the parallel in the Example 4 or serial in the Example 5
stopwatches can manage the advances in a programmed manner from
the first to the last slide. Thus, in order to avoid a break in
continuity, there must be a defined time for each slide. If
there is not, a default of 10 seconds is adopted. - The examples 8 and 9 deal with countdown of steps in a presentation such as the minimum and maximum acceptable time to perform a presentation. While in the the Example 8 the stopwatches for each step are launched simultaneously in parallel, in the Example 9, they are launched in series. Example 1 - Creation of command in PowerPoint menu (See note 1)The purpose of this example is to show the VBA code needed to call the stopwatch just as it is called from the PowerPoint user interface, using the last call setting saved in an ini file. It allows you to call the stopwatch both during editing time and also while the slideshow is running. Download the zipped ppt file of this example by clicking the link below and open it in PowerPoint: After opening the ppt in PowerPoint: - You can immediately test its code in the example presentation itself, just run the SlideShow (F5) and click the “Start PowerPointStopwatch_Ex1” button available on the first slide to open the popup stopwatch in the PowerPoint interface. (See note 2) - You can implement the VBA code as it is in the example ppt in the VBA project of your specific presentation, just open the Visual Basic (VBE) window with Alt+F11 and copy the ClassPPointStopwatch class module and the standard ModExamp1 module from the example to the VBA project of your presentation. That's all, if you are going to save your presentation as a ppa add-in, but if you are going to use it as a normal presentation, you still need to create the button or buttons similar to those on the first slide of the example on the first slide of your presentation. - You can use the example VBA code in any of your presentations without the need for editing, simply run the add-in (ppa) from the example presentation, which you can create and save using the “Save as add-in (ppa)” button also available on the first slide. Note 1: This example is presented first not because of its importance, but to illustrate a sequence of examples that gradually increase in complexity and usefulness. The following example is usually an improvement on the previous one, making the code easier to understand. With simple VBA code, this example can create a timer popup during presentation editing, which is unlikely to be very useful. With more complex VBA code, the following examples, used during slideshows, are probably more useful. Note 2: To test presentations with VBA code, you need to set your PowerPoint macro security to medium so that you can enable macros when prompted when opening presentations. You also need to install 'Popup Stopwatch for PowerPoint' which can be downloaded free for personal use via the What's new Download link above on this page. Alternatively, this example also works if you prefer to install 'Popup Stopwatch for Excel', which is also available here . Example 2 - Countdown for coffee break (model 1)The purpose of this Example 2 is to show the VBA code needed to create a stopwatch in countdown for a coffee break in a presentation that uses external files for the background picture and for the expiration sound. It teaches how to create a stopwatch to count down a time interval. Before starting the countdown, it pauses the slideshow of the active presentation and when the countdown expires, it resumes the slideshow. The stopwatch will be configured to move on the screen as a protector, with a transparent display and an opaque background with a picture from a jpg file saved on the disk and, when it expires it will beep and play a sound from a wav file. Both files must have the same name as the active presentation file and be saved in the same folder. Download the zipped ppt file of this example by clicking the link below and open it in PowerPoint: After opening the ppt in PowerPoint: - You can immediately test its code in the example presentation itself, just run the SlideShow (F5) and click the “Start PowerPointStopwatch_Ex2” button available on the first slide to set the time interval and then start its countdown. (See note 2) - You can implement the VBA code as it is in the example ppt in the VBA project of your specific presentation, just open the Visual Basic (VBE) window with Alt+F11 and copy the class module ClassPPointStopwatch, the standard module ModExamp2, and the userform UFormExamp2 to the VBA project of your presentation. That's all, if you are going to save your presentation as an add-in (ppa, ppam), otherwise you still need to create similar button on slides of your presentation to start. (See note 3) - You can use the example VBA code in any of your presentations without the need for editing, simply run the add-in (ppa) from the example presentation, which you can create and save using the “Save as add-in (ppa)” button also available on the first slide. You don't need to install the add-in in PowerPoint, just double click on its ppa file in Windows Explorer and if your presentation is already open in PowerPoint it will start doing the same thing it does with its own test presentation, whereas if your presentation is not already open it will direct you to open it. Note 3: The VBA code in each example (press Alt+F11 to see) is properly formatted and has instructions to make it easier for you, even without knowledge of VBA, to change any of the hundreds of stopwatch settings, mainly interface elements related to sizes, position on the screen, colors, fonts, background picture, transparencies and even total transparency of the stopwatch with automatic show of only the display font when you bring the mouse closer or press the Ctrl key. Example 3 - Countdown for coffee break (model 2)The purpose of this Example 3 is to show the VBA code needed to create a stopwatch in countdown for a coffee break in a presentation that does not use external files for background picture and the expiration sound. It teaches how to create a stopwatch to count down a time interval. Before starting the countdown, it pauses the slideshow of the active presentation and when the countdown expires, it resumes the slideshow. The stopwatch will be configured to move on the screen as a protector, with a transparent display and also a transparent background to use the active slide itself as the background. In particular, if the active presentation has two hidden slides at the end with the first set to a coffee break picture and the next with a transition sound, it will activate the first one before the countdown starts and the second one when the countdown expires. Therefore, this example does not require picture and sound to be saved in separate files from the presentation file. Download the zipped ppt file of this example by clicking the link below and open it in PowerPoint: After opening the ppt in PowerPoint: - You can immediately test its code in the example presentation itself, just run the SlideShow (F5) and click the “Start PowerPointStopwatch_Ex3” button available on the first slide to set the time interval and then start its countdown. (See note 2) - You can implement the VBA code as it is in the example ppt in the VBA project of your specific presentation, just open the Visual Basic (VBE) window with Alt+F11 and copy the class module ClassPPointStopwatch, the standard module ModExamp3, and the userform UFormExamp3 to the VBA project of your presentation. That's all, if you are going to save your presentation as an add-in (ppa, ppam), otherwise you still need to create similar button on slides of your presentation to start. (See note 3) - You can use the example VBA code in any of your presentations without the need for editing, simply run the add-in (ppa) from the example presentation, which you can create and save using the “Save as add-in (ppa)” button also available on the first slide. You don't need to install the add-in in PowerPoint, just double click on its ppa file in Windows Explorer and if your presentation is already open in PowerPoint it will start doing the same thing it does with its own test presentation, whereas if your presentation is not already open it will direct you to open it. Example 4 - Countdown to advance slide (In parallel)The purpose of this Example 4 is to show the VBA code needed to create a stopwatch in countdown on each slide to advance to the next slide when the countdown expires. The stopwatches for all slides will be launched in parallel and simultaneously. It also teaches how to launch more than one stopwatch simultaneously in parallel, counting down different times. A stack of stopwatches will appear on the screen, with the shortest one overlapping the longest one, but their buttons will be attached, so if the top one stops, the bottom one will also stop, and similarly if it restarts. Example 5 below, which has the same objective and efficiency, teaches how to launch in series, where the first one, upon expiring, calls the next one, thus keeping only a stopwatch counting on the display. Download the zipped ppt file of this example by clicking the link below and open it in PowerPoint: After opening the ppt in PowerPoint: - You can immediately test its code in the example presentation itself, just run the SlideShow (F5) and click the “Start PowerPointStopwatch_Ex4” button available on the first slide to create a stopwatch in count down on each slide to advance to the next slide when the countdown expires. The time will be captured from the slide transition's AdvanceTime property, if it is set, otherwise a default time will be assumed. (See note 2) - You can implement the VBA code as it is in the example ppt in the VBA project of your specific presentation, just open the Visual Basic (VBE) window with Alt+F11 and copy the class module ClassPPointStopwatch and the standard module ModExamp4 to the VBA project of your presentation. That's all, if you are going to save your presentation as an add-in (ppa, ppam), otherwise you still need to create similar button on slides of your presentation to start. (See note 3) - You can use the example VBA code in any of your presentations without the need for editing, simply run the add-in (ppa) from the example presentation, which you can create and save using the “Save as add-in (ppa)” button also available on the first slide. You don't need to install the add-in in PowerPoint, just double click on its ppa file in Windows Explorer and if your presentation is already open in PowerPoint it will start doing the same thing it does with its own test presentation, whereas if your presentation is not already open it will direct you to open it. Example 5 - Countdown to advance slide (In series)The purpose of this Example 5 is to show the VBA code needed to create a stopwatch in countdown on each slide to advance to the next slide when the countdown expires. The stopwatches will be launched in series. one after the other. It also teaches how to launch more than one stopwatch in series, where the first one, upon expiring, calls the next one, thus keeping only a stopwatch counting on the display. Example 4, which has the same objective and efficiency, teaches how to launch more than one stopwatch simultaneously in parallel, counting down different times, thus forming a stack on the display. Download the zipped ppt file of this example by clicking the link below and open it in PowerPoint: After opening the ppt in PowerPoint: - You can immediately test its code in the example presentation itself, just run the SlideShow (F5) and click the “Start PowerPointStopwatch_Ex5” button available on the first slide to create a stopwatch in count down there to advance to the next slide when the countdown there expires and so on. The time will be captured from the slide transition's AdvanceTime property, if it is set, otherwise a default time will be assumed. (See note 2) - You can implement the VBA code as it is in the example ppt in the VBA project of your specific presentation, just open the Visual Basic (VBE) window with Alt+F11 and copy the class module ClassPPointStopwatch and the standard module ModExamp5 to the VBA project of your presentation. That's all, if you are going to save your presentation as an add-in (ppa, ppam), otherwise you still need to create similar button on slides of your presentation to start. (See note 3) - You can use the example VBA code in any of your presentations without the need for editing, simply run the add-in (ppa) from the example presentation, which you can create and save using the “Save as add-in (ppa)” button also available on the first slide. You don't need to install the add-in in PowerPoint, just double click on its ppa file in Windows Explorer and if your presentation is already open in PowerPoint it will start doing the same thing it does with its own test presentation, whereas if your presentation is not already open it will direct you to open it. Example 6 - Countdown to advance slide (auto hook)The purpose of this Example 6 is to show the VBA code required to create a stopwatch, which will be called automatically by the application's SlideShowNextSlide event, in count down to advance to the next slide when the countdown expires. It's as if the stopwatch hooks for itself to make the PowerPoint's automatic slide advance feature, even though it's off. The time will be captured from the active slide transition's AdvanceTime property, if it is set, otherwise nothing happens. Only the amount of time in seconds set in the AdvanceTime property is important. The AdvanceOnTime and AdvanceMode properties that enable it are ignored, whether they are set to True or False, because the automatic advance of the slides will be done by the stopwatch and not by PowerPoint. Download the zipped ppt file of this example by clicking the link below and open it in PowerPoint: After opening the ppt in PowerPoint: - You can immediately test its code in the example presentation itself, just run the SlideShow (F5) and click the “Start PowerPointStopwatch_Ex6” button available on the first slide to enable PowerPoint application events, and when activating a slide manually or by code, a countdown timer can be launched to do the advance to the next slide when the countdown expires. The time will be captured from the slide transition's AdvanceTime property, if it is set, otherwise nothing happens. (See note 2) - You can implement the VBA code as it is in the example ppt in the VBA project of your specific presentation, just open the Visual Basic (VBE) window with Alt+F11 and copy the class module ClassPPointStopwatch and the standard module ModExamp6 to the VBA project of your presentation. That's all, if you are going to save your presentation as an add-in (ppa, ppam), otherwise you still need to create similar button on slides of your presentation to start. (See note 3) - You can use the example VBA code in any of your presentations without the need for editing, simply run the add-in (ppa) from the example presentation, which you can create and save using the “Save as add-in (ppa)” button also available on the first slide. You don't need to install the add-in in PowerPoint, just double click on its ppa file in Windows Explorer and if your presentation is already open in PowerPoint it will start doing the same thing it does with its own test presentation, whereas if your presentation is not already open it will direct you to open it. Example 7 - Countdown to advance slide (PPAccelerator)The purpose of this Example 7 is to show the VBA code required to create a stopwatch in count down on each slide to advance to the next slide when the countdown expires. The time will be captured from the slide transition's AdvanceTime property, if it is set, or if it is entered directly by the user in a form displayed already with suggestions for each slide. The same form allows you to (de)accelerate the speed of the presentation or pin its end to a date/time on the clock with proportional and dynamic distribution of remaining time on the following slides. Only the amount of time in seconds set in the AdvanceTime property is important. The AdvanceOnTime and AdvanceMode proper-ties that enable it are ignored, because the automatic advance of the slides will be done by the stopwatch and not by PowerPoint and in proportional times according to the desired acceleration. This example gave rise to the add-in PPAccelerator for PowerPoint distributed here on this site. Download the zipped ppt file of this example by clicking the link below and open it in PowerPoint: After opening the ppt in PowerPoint: - You can immediately test its code in the example presentation itself, just run the SlideShow (F5) and click the “Start PowerPointStopwatch_Ex7” button available on the first slide to create a stopwatch in count down on each slide to advance to the next slide when the countdown expires. Before the times will be captured from each slide transition's AdvanceTime property, if it is set, or if it is entered directly by you in a form displayed already with suggestions for each slide. The same form allows you to (de)accelerate the speed of the presentation or pin its end to a date/time on the clock with proportional and dynamic distribution of remaining time on the following slides. (See note 2) - You can implement the VBA code as it is in the example ppt in the VBA project of your specific presentation, just open the Visual Basic (VBE) window with Alt+F11 and copy the class module ClassPPointStopwatch, the standard module ModExamp7, and the userform UFormExamp7 to the VBA project of your presentation. That's all, if you are going to save your presentation as an add-in (ppa, ppam), otherwise you still need to create similar button on slides of your presentation to start. (See note 3) - You can use the example VBA code in any of your presentations without the need for editing, simply run the add-in (ppa) from the example presentation, which you can create and save using the “Save as add-in (ppa)” button also available on the first slide. You don't need to install the add-in in PowerPoint, just double click on its ppa file in Windows Explorer and if your presentation is already open in PowerPoint it will start doing the same thing it does with its own test presentation, whereas if your presentation is not already open it will direct you to open it. Example 8 - Countdown in presentation steps (in parallel)The purpose of this Example 8 is to show the VBA code needed to create two stopwatches in countdown launched in parallel and simultaneously. One to alert the minimum duration limit of the active presentation and another for the maximum. It also teaches how to launch more than one stopwatch simultaneously in parallel, counting down different times. A stack of stopwatches will appear on the screen, with the shortest one overlapping the longest one, but their buttons will be attached, so if the top one stops, the bottom one will also stop, and similarly if it restarts. Example 9 below, which has the same objective and efficiency, teaches how to launch in series, where the first one, upon expiring, calls the next one, thus keeping only a stopwatch counting on the display. Download the zipped ppt file of this example by clicking the link below and open it in PowerPoint: After opening the ppt in PowerPoint: - You can immediately test its code in the example presentation itself, just run the SlideShow (F5) and click the “Start PowerPointStopwatch_Ex8” button available on the first slide to create in parallel two stopwatches in countdown. One to alert the minimum and another for the maximum duration limit of the active presentation with four slides set only to test this example. (See note 2) - You can implement the VBA code as it is in the example ppt in the VBA project of your specific presentation, just open the Visual Basic (VBE) window with Alt+F11 and copy the class module ClassPPointStopwatch, the standard module ModExamp8, and the userform UFormExamp8 to the VBA project of your presentation. That's all, if you are going to save your presentation as an add-in (ppa, ppam), otherwise you still need to create similar button on slides of your presentation to start. (See note 3) - You can use the example VBA code in any of your presentations without the need for editing, simply run the add-in (ppa) from the example presentation, which you can create and save using the “Save as add-in (ppa)” button also available on the first slide. You don't need to install the add-in in PowerPoint, just double click on its ppa file in Windows Explorer and if your presentation is already open in PowerPoint it will start doing the same thing it does with its own test presentation, whereas if your presentation is not already open it will direct you to open it. Example 9 - Countdown in presentation steps (in series)The purpose of this Example 9 is to show the VBA code needed to create two stopwatches in countdown launched in series. One to alert the minimum duration limit of the active presentation and another for the maximum. It also teaches how to launch more than one stopwatch in series, where the first one, upon expiring, calls the next one, thus keeping only a stopwatch counting on the display. Example 8 above, which has the same objective and efficiency, teaches how to launch more than one stopwatch simultaneously in parallel, counting down different times, thus forming a stack on the display. Download the zipped ppt file of this example by clicking the link below and open it in PowerPoint: After opening the ppt in PowerPoint: - You can immediately test its code in the example presentation itself, just run the SlideShow (F5) and click the “Start PowerPointStopwatch_Ex9” button available on the first slide to create in series two stopwatches in countdown. One to alert the minimum limit for presentation and another for the maximum of this active presentation with four slides set only to test this example. (See note 2) - You can implement the VBA code as it is in the example ppt in the VBA project of your specific presentation, just open the Visual Basic (VBE) window with Alt+F11 and copy the class module ClassPPointStopwatch, the standard module ModExamp9, and the userform UFormExamp9 to the VBA project of your presentation. That's all, if you are going to save your presentation as an add-in (ppa, ppam), otherwise you still need to create similar button on slides of your presentation to start. (See note 3) - You can use the example VBA code in any of your presentations without the need for editing, simply run the add-in (ppa) from the example presentation, which you can create and save using the “Save as add-in (ppa)” button also available on the first slide. You don't need to install the add-in in PowerPoint, just double click on its ppa file in Windows Explorer and if your presentation is already open in PowerPoint it will start doing the same thing it does with its own test presentation, whereas if your presentation is not already open it will direct you to open it.
|
|||||||||||||||||||||||||||||||||||||||||||
|
|
|||||||||||||||||||||||||||||||||||||||||||